

DotNet-8

Introduction:
In today's fast-paced digital world, real-time communication is a must for chat applications, live notifications, collaborative tools, and more. With SignalR Chat Application, you can create a seamless real-time messaging system in .NET 8 SignalR that allows instant message delivery without page refresh. This guide will help you understand SignalR WebSockets, the working mechanism of ASP.NET Core SignalR, and how to Build Chat App with SignalR efficiently.

SignalR establishes a persistent connection between a client and server and establishes a persistent connection through a Hub that acts like a central part of communication. This is how it works:
1. Client Makes Connection: A SignalR Hub to which the client connects with.
2. Server Establishes Persistent Connection: The SignalR Hub automatically decides the transport between the WebSockets and
others.
3. Two-Way Communication Started: The messages may be interchanged in real time between the server and clients.
4. Message Broadcasting: The server can send messages to specific users, groups, or all connected users.


To build a real-time chat application with signalR , We will use the following technologies, but some features are not covered in this blog:
Key Features of the Chat Application with Blazor
Send messages to a specific user
Group chat functionality
Broadcast messages to all users
User authentication with ASP.NET Identity
Database with Entity Framework Core
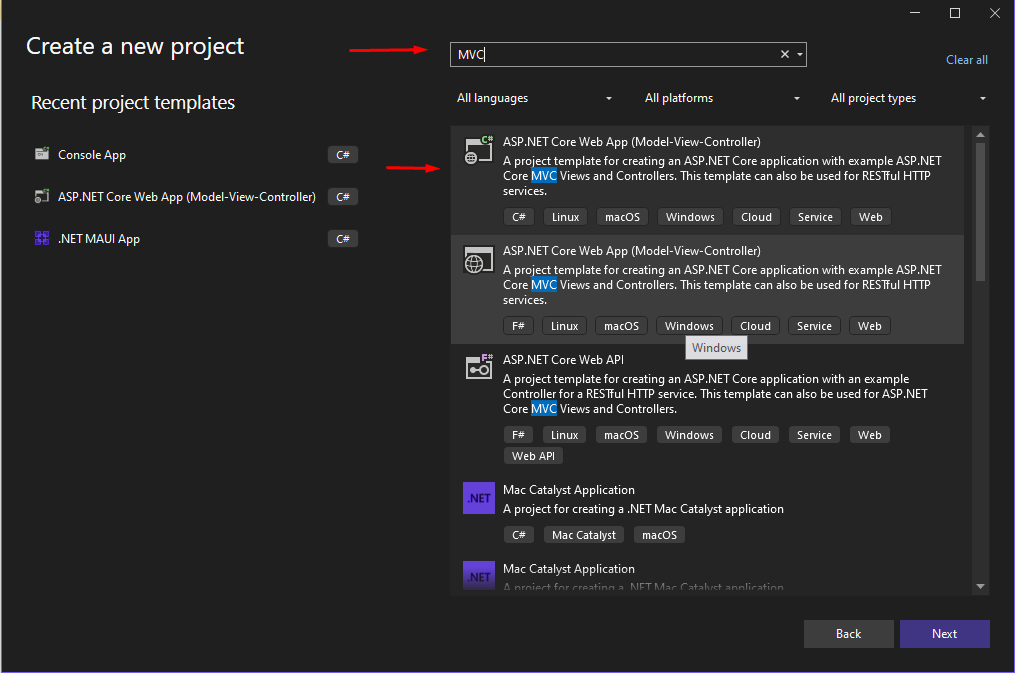
So first create a new project in a visual studio, search for MVC and select ASP.NET Core Web (Model-View-Controller) option, then click next.
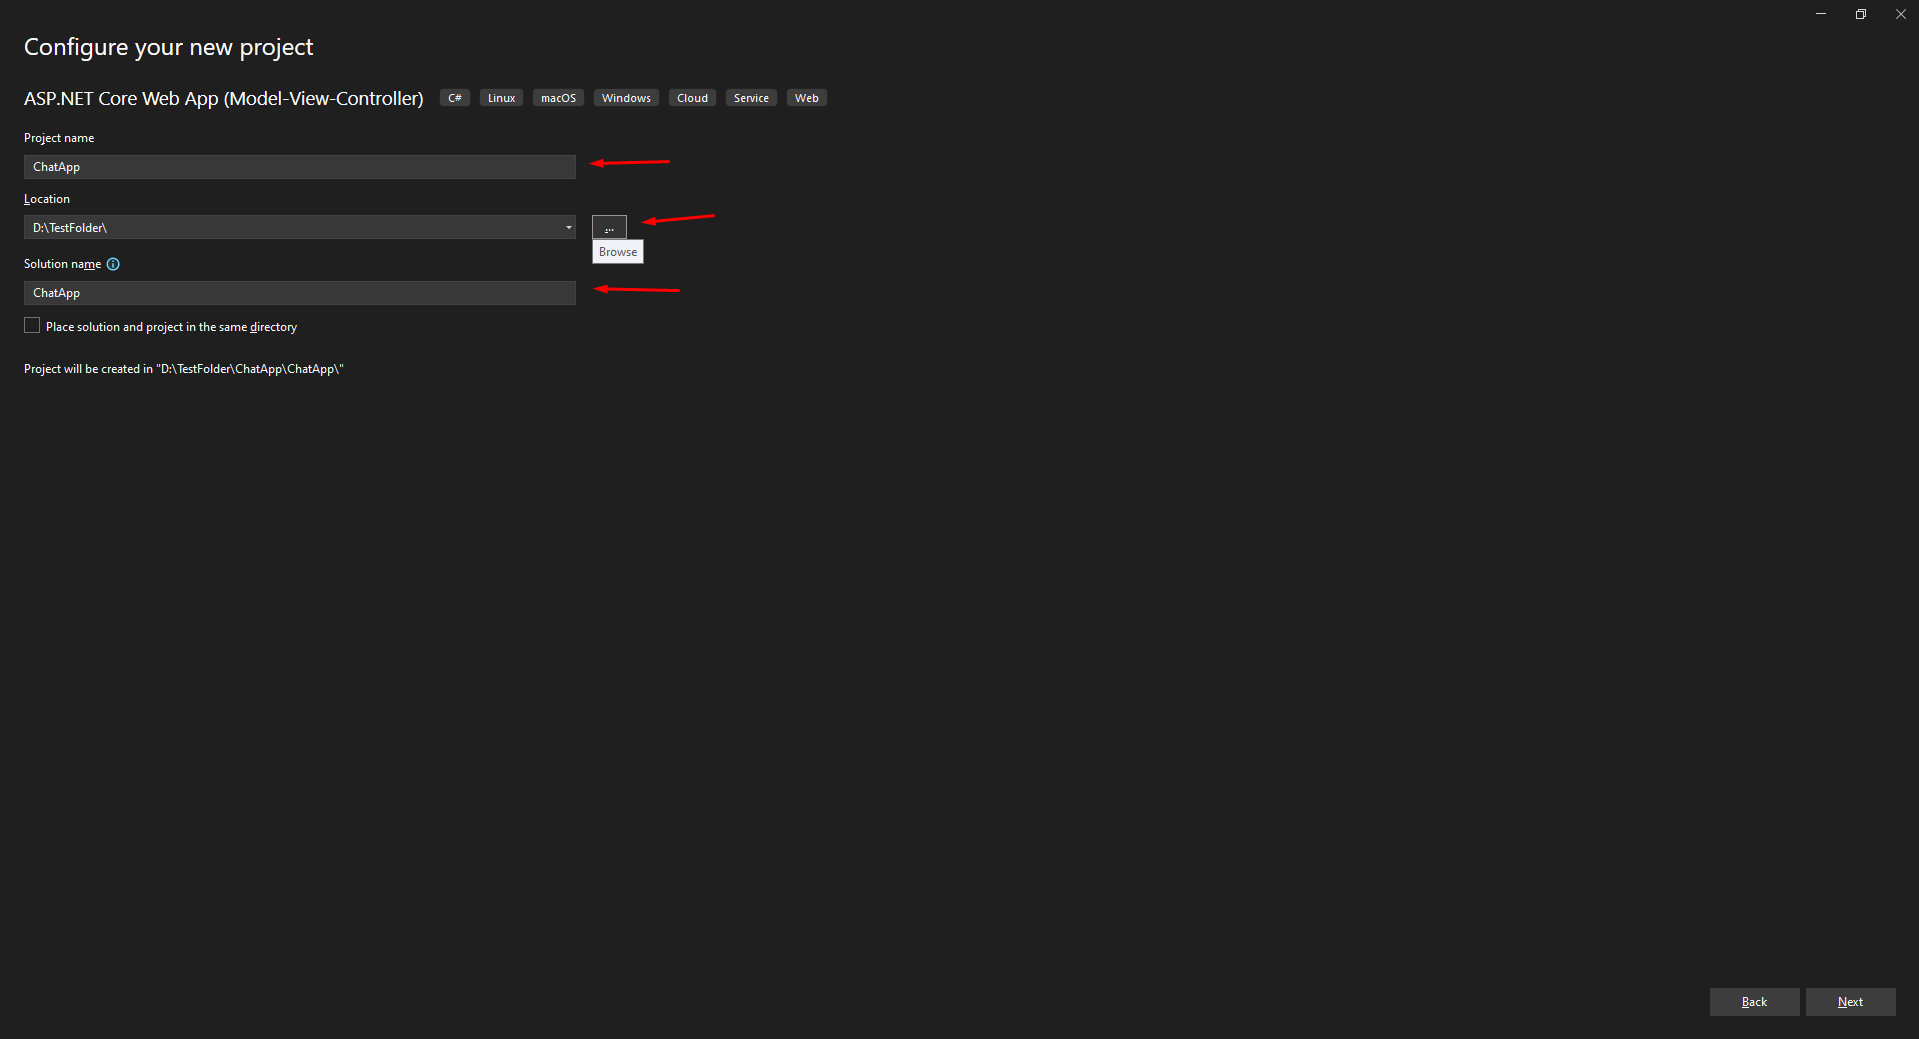
After that you need to give project name and location where you want to save your project, then click next.
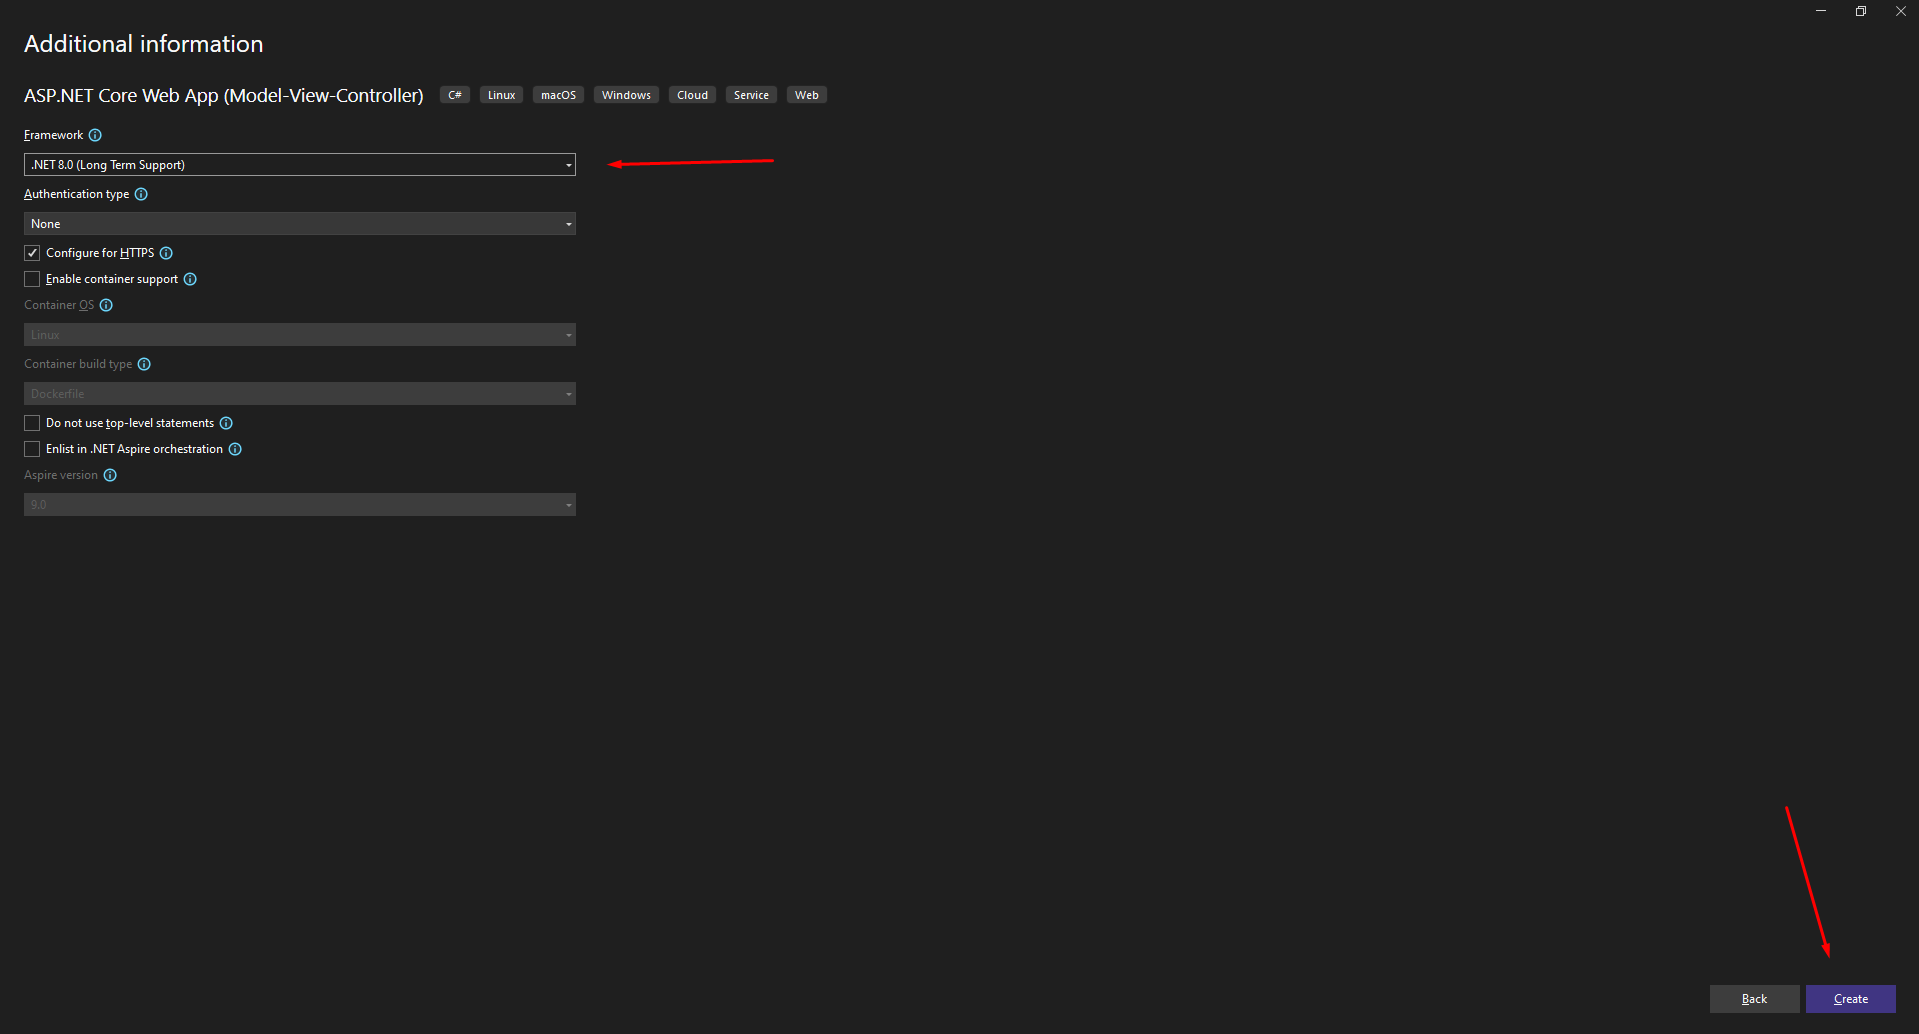
We should select .NET latest version and click next.
After project created you need to install SignalR nuget package.
To build a real-time messaging app for C# using the SignalR Hub in.NET 8.
To start things off, first, install the SignalR package into your ASP.NET Core chat application:
Create a Hub to handle real-time interactions:
now create a folder called Hubs on the root level of project and create ChatHub.cs file inside that folder.
In this class you need to give a base class ChatHub.cs like this
public class ChatHub : Hub
After this, go to your Program.cs file and register the Microsoft SignalR service, then map your hub with a route.
Program.cs:
SignalR with JavaScript
using Microsoft.AspNetCore.SignalR;
builder.Services.AddSignalR();
app.MapHub<ChatHub>("/chatHub");
After this, go to index.chtml or create your own page and add the below code.
Below is the code for index.chtml, where you define the chat UI and include the necessary SignalR scripts.
<link href="~/css/chat.css" rel="stylesheet" />
<h2>Chat Application</h2>

<div id="chatWindow">
    <ul id="messages"></ul>
</div>

<div class="controls">
    <h1 id="UserId"></h1>
    <input type="text" id="userName" placeholder="Enter your name" class="input-field" />
    <input type="text" id="messageInput" placeholder="Enter message" class="input-field" />
    <button id="sendToAllButton" class="button">Send to All</button>
    <br />
    <input type="text" id="groupNameInput" placeholder="Enter group name" class="input-field" />
    <button id="joinGroupButton" class="button">Join Group</button>
    <button id="leaveGroupButton" class="button">Leave Group</button>
    <button id="sendToGroupButton" class="button">Send to Group</button>
    <br />
    <input type="text" id="userIdInput" placeholder="Enter user ID" class="input-field" />
    <button id="sendToUserButton" class="button">Send to User</button>
</div>

<script src="https://cdnjs.cloudflare.com/ajax/libs/microsoft-signalr/7.0.5/signalr.min.js"></script>
<script src="/js/chat.js"></script>
The above code defines your UI, now lets implement chat.js and chat.css files as you can see we included them in above code.
Create a new file chat.css inside wwwroot/css/chat.css/ folder of your MVC app And paste the below code.
Below is the code for chat.css, which contains styles for the chat UI.
/* General Styling */
body {
    font-family: Arial, sans-serif;
    background-color: #f4f7fc;
    color: #333;
    margin: 0;
    padding: 0;
}

h2 {
    text-align: center;
    margin-top: 20px;
    color: #4e73df;
}

#chatWindow {
    background-color: #fff;
    padding: 20px;
    border-radius: 8px;
    box-shadow: 0 4px 8px rgba(0, 0, 0, 0.1);
    max-width: 600px;
    margin: 20px auto;
}

#messages {
    list-style-type: none;
    padding: 0;
    max-height: 120px;
    overflow-y: auto;
    display: flex;
    flex-direction: column;
}

#messages li {
    background-color: #f8f9fc;
    margin: 5px 0;
    padding: 10px;
    border-radius: 5px;
    box-shadow: 0 1px 2px rgba(0, 0, 0, 0.1);
}

/* Controls Section */
.controls {
    text-align: center;
    max-width: 600px;
    margin: 20px auto;
    padding: 20px;
    background-color: #fff;
    border-radius: 8px;
    box-shadow: 0 4px 8px rgba(0, 0, 0, 0.1);
}

.input-field {
    width: 80%;
    padding: 10px;
    margin: 10px 0;
    border: 1px solid #ccc;
    border-radius: 5px;
    font-size: 16px;
    outline: none;
}

.input-field:focus {
    border-color: #4e73df;
}

.button {
    padding: 10px 20px;
    background-color: #4e73df;
    color: #fff;
    border: none;
    border-radius: 5px;
    font-size: 16px;
    cursor: pointer;
    margin: 10px;
}

.button:hover {
    background-color: #2e59d9;
}

h1 {
    font-size: 20px;
    color: #333;
}

/* Responsive Design */
@media (max-width: 768px) {
    .controls {
        padding: 15px;
    }

    .input-field {
        width: 90%;
    }

    .button {
        width: 100%;
        margin: 5px 0;
    }
}
Then create chat.js file in wwwroot/js/chat.js folder and paste below code
Below is the code for chat.js, which handles SignalR real-time messaging.
document.addEventListener("DOMContentLoaded", function () {
    // Connect to the SignalR hub
    const connection = new signalR.HubConnectionBuilder()
        .withUrl("/chatHub")
        .build();

    // Log the connection ID for debugging
    connection.start().then(function () {
        let uniqueNumber;
        connection.invoke("GetUniqueNumber", connection.connectionId)
        .then(uniqueNum => {
            uniqueNumber = uniqueNum;
            console.log("Receive ID: ", uniqueNum);
            document.getElementById("UserId").innerText = "UserId to receive message on: " + uniqueNum;
         })
        .catch(err => console.log(err));

        console.log("Connected to SignalR hub. Connection ID: ", connection.connectionId);

        // Receive a message
        connection.on("SignalREvent", function (message, userName) {
            const messagesList = document.getElementById("messages");
            const listItem = document.createElement("li");
            listItem.textContent = `User: ${userName} Message: ${message}`;
            messagesList.appendChild(listItem);
        });

        // Send a message to all users
        document.getElementById("sendToAllButton").addEventListener("click", function () {
            const messageInput = document.getElementById("messageInput");
            const userName = document.getElementById("userName");
            const message = messageInput.value;
            connection.invoke("SendToAll", message, userName.value)
                .catch(err => console.error("Error sending message to all:", err));
            messageInput.value = "";
        });

        // Join a group
        document.getElementById("joinGroupButton").addEventListener("click", function () {
            const groupNameInput = document.getElementById("groupNameInput");
            const userName = document.getElementById("userName");
            alert(userName.value + " Joined the group");
            const groupName = groupNameInput.value;
            connection.invoke("JoinGroup", groupName)
                .catch(err => console.error("Error while joining group:", err));
        });

        document.getElementById("leaveGroupButton").addEventListener("click", function () {
            const groupNameInput = document.getElementById("groupNameInput");
            const userName = document.getElementById("userName");
            alert(userName.value + " Left the group");
            const groupName = groupNameInput.value;
            connection.invoke("LeaveGroup", groupName)
                .catch(err => console.error("Error while leaving group:", err));
        });

        // Send a message to a group
        document.getElementById("sendToGroupButton").addEventListener("click", function () {
            const groupNameInput = document.getElementById("groupNameInput");
            const groupName = groupNameInput.value;
            const messageInput = document.getElementById("messageInput");
            const userName = document.getElementById("userName");
            const message = messageInput.value;
            connection.invoke("SendToGroup", groupName, message, userName.value)
                .catch(err => console.error("Error sending message to group:", err));
            messageInput.value = "";
        });

        // Send a message to a specific user
        document.getElementById("sendToUserButton").addEventListener("click", function () {
            // Get the user ID from the input field
            const userId = document.getElementById("userIdInput").value;
            const userName = document.getElementById("userName").value;
            // Get the message from the input field
            const message = document.getElementById("messageInput").value;

            // Call the SignalR method to send the message to the specified user
            connection.invoke("SendToUser", userId, message, userName)
                .catch(err => console.error("Error sending message to user:", err));

            // Clear the message input field
            document.getElementById("messageInput").value = "";
        });

    }).catch(err => console.error("Error connecting to SignalR hub:", err));
});Use JavaScript to connect to the SignalR Hub and send messages.
With SignalR Chat Application, you can send messages to specific users or groups:
public class ChatHub : Hub
{
    // Store user connections (userId -> connectionId)
    private static readonly ConcurrentDictionary<string, string> _userConnections = new ConcurrentDictionary<string, string>();
    // When a user connects, store their connectionId with their userId
    public override Task OnConnectedAsync()
    {
        Random random = new Random();
        string uniqueNumber = random.Next(1000000000, int.MaxValue).ToString();
        _userConnections[Context.ConnectionId] = uniqueNumber;
        Console.WriteLine($"User connected: {uniqueNumber} with ConnectionId: {Context.ConnectionId}");
        return base.OnConnectedAsync();
    }

    // When a user disconnects, remove their connectionId
    public override Task OnDisconnectedAsync(Exception? exception)
    {
        string userId = Context.UserIdentifier ?? Context.ConnectionId;
        _userConnections.TryRemove(userId, out _);
        Console.WriteLine($"User disconnected: {userId}");
        return base.OnDisconnectedAsync(exception);
    }
    // Send a message to a specific user by their userId
    public async Task SendToUser(string userId, string message, string userName)
    {
        // Find the connectionId where userId exists as a value
        var connectionEntry = _userConnections.FirstOrDefault(x => x.Value == userId);
        if (!string.IsNullOrEmpty(connectionEntry.Key))
        {
            await Clients.Client(connectionEntry.Key).SendAsync("SignalREvent", message, userName);
        }
        else
        {
            await Clients.Caller.SendAsync("SignalREvent", "User not found.");
        }
    }

    public async Task<string> GetUniqueNumber(string connectionId)
    {
        var uniqueNumber = _userConnections[connectionId];
        return uniqueNumber.ToString();
    }

    // Send a message to a specific group
    public async Task SendToGroup(string groupName, string message, string userName)
    {
        await Clients.Group(groupName).SendAsync("SignalREvent", message, userName);
    }

    // Send a message to all connected clients
    public async Task SendToAll(string message, string userName)
    {
        await Clients.All.SendAsync("SignalREvent", message, userName);
    }
    // Join a group
    public async Task JoinGroup(string groupName)
    {
        await Groups.AddToGroupAsync(Context.ConnectionId, groupName);
    }
    // Leave a group
    public async Task LeaveGroup(string groupName)
    {
        await Groups.RemoveFromGroupAsync(Context.ConnectionId, groupName);
    }
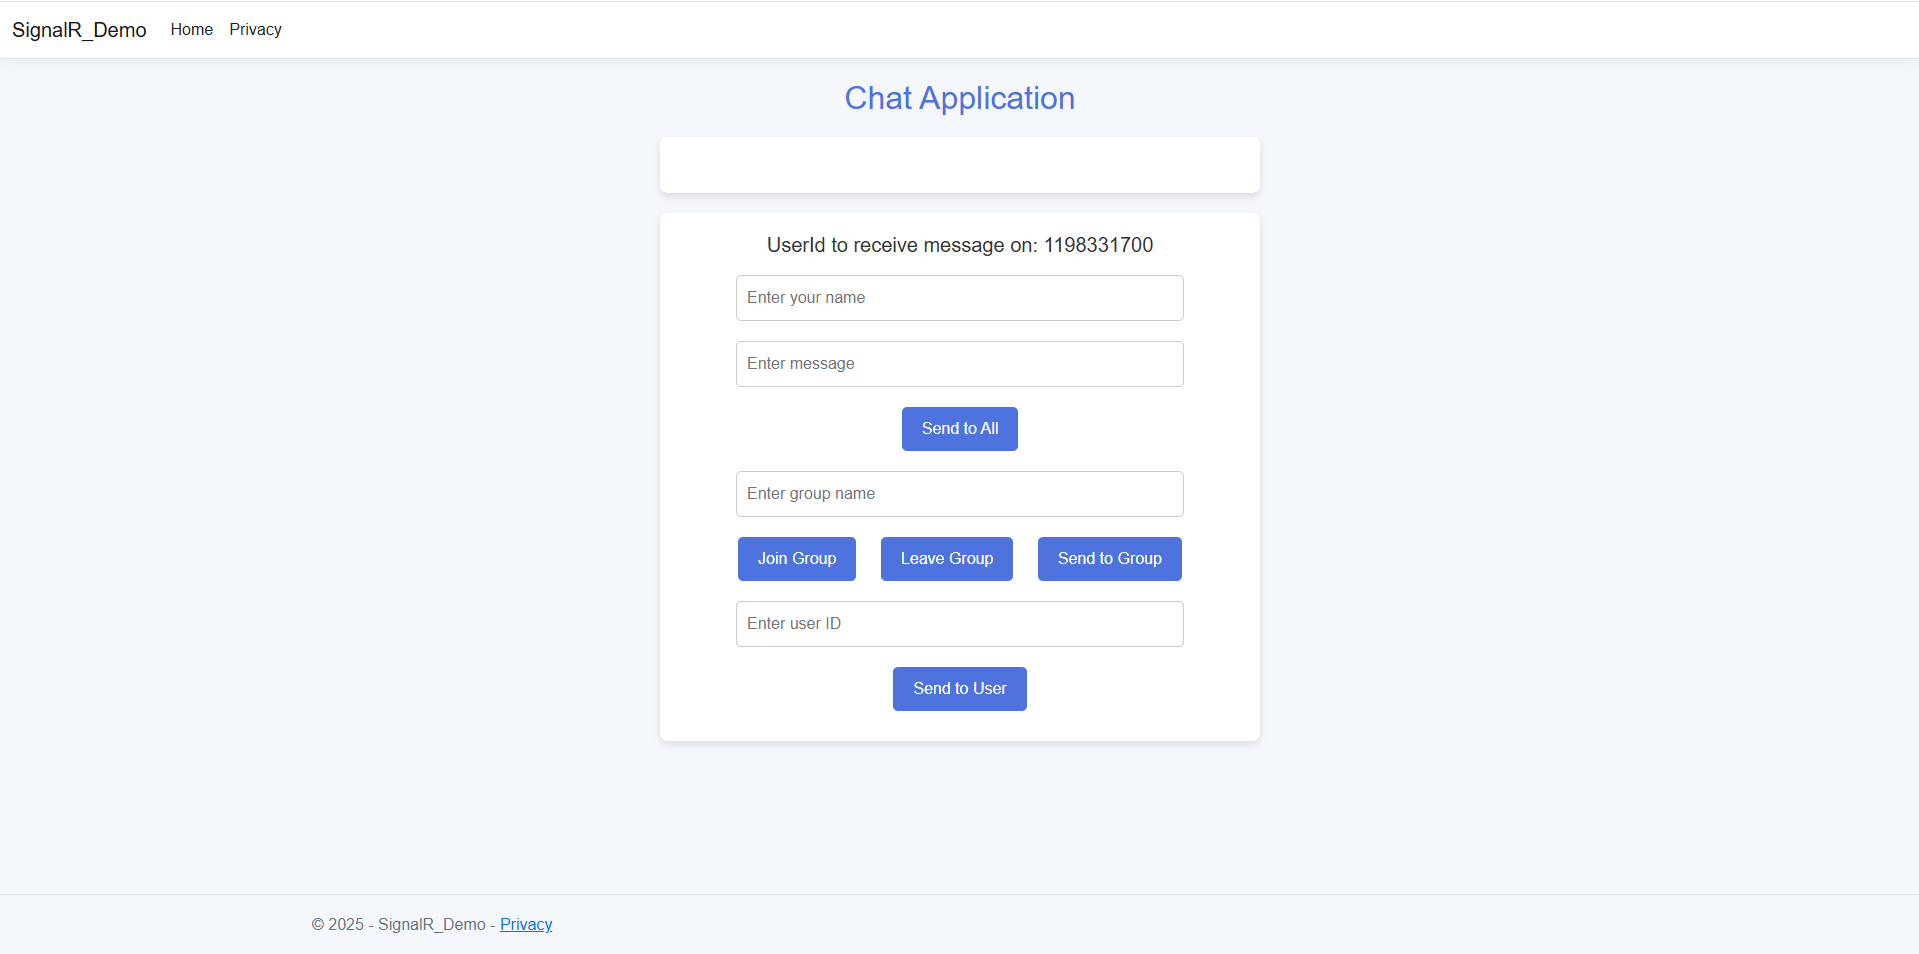
}
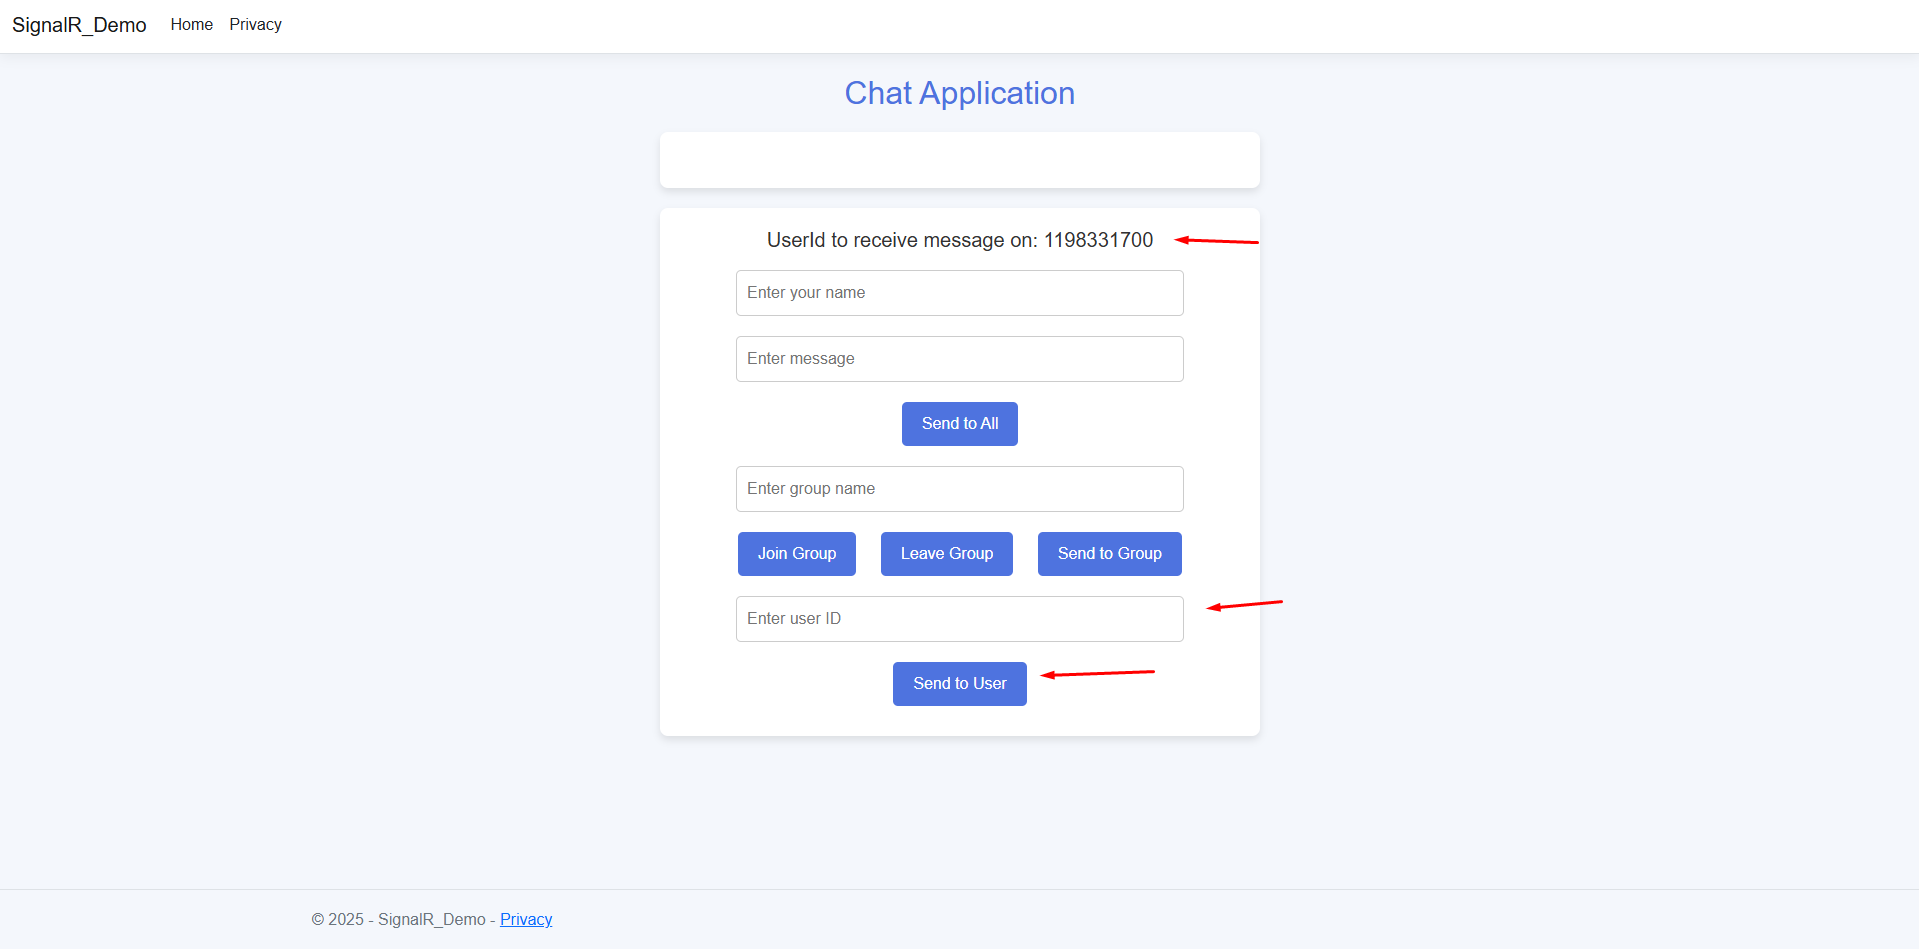
The UI displays a UserId where messages are received. The backend generates a UserId when a user connects to SignalR.
public override Task OnConnectedAsync()
{
    Random random = new Random();
    string uniqueNumber = random.Next(1000000000, int.MaxValue).ToString();
    _userConnections[Context.ConnectionId] = uniqueNumber;
    Console.WriteLine($"User connected: {uniqueNumber} with ConnectionId: {Context.ConnectionId}");
    return base.OnConnectedAsync();
}public async Task<string> GetUniqueNumber(string connectionId)
{
var uniqueNumber = _userConnections[connectionId];
return uniqueNumber.ToString();
}
//You can access that userId in your JavaScript code like this:
connection.invoke("GetUniqueNumber", connection.connectionId)
.then(uniqueNum => {
uniqueNumber = uniqueNum;
console.log("Receive ID: ", uniqueNum);
document.getElementById("UserId").innerText = "UserId to receive message on: " + uniqueNum;
})
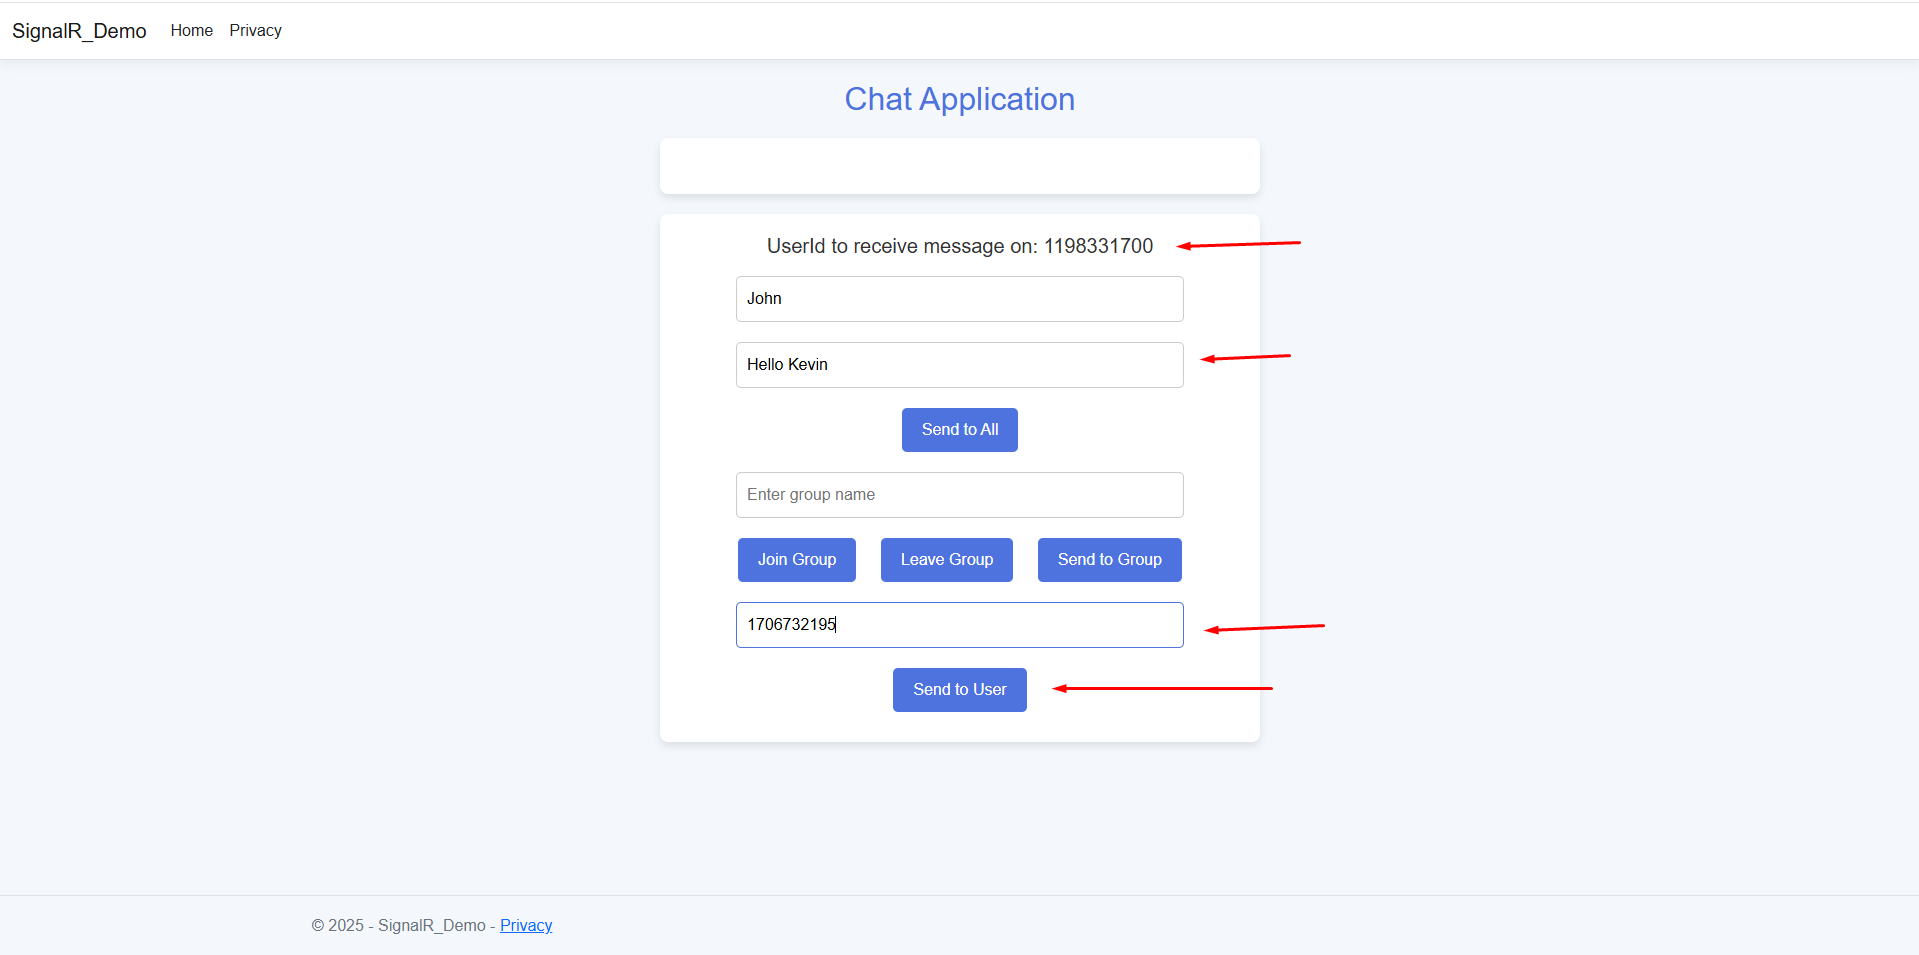
.catch(err => console.log(err));document.getElementById("sendToUserButton").addEventListener("click", function () {…}
//Which invokes SendToUser function from ChatHub.cs class
//in which we wrote this lines which sends/triggers event with connectionId, your message and user name
await Clients.Client(connectionId).SendAsync("SignalREvent", message, userName);connection.on("SignalREvent", function (message, userName) {
const messagesList = document.getElementById("messages");
const listItem = document.createElement("li");
listItem.textContent = `User: ${userName} Message: ${message}`;
messagesList.appendChild(listItem);
});
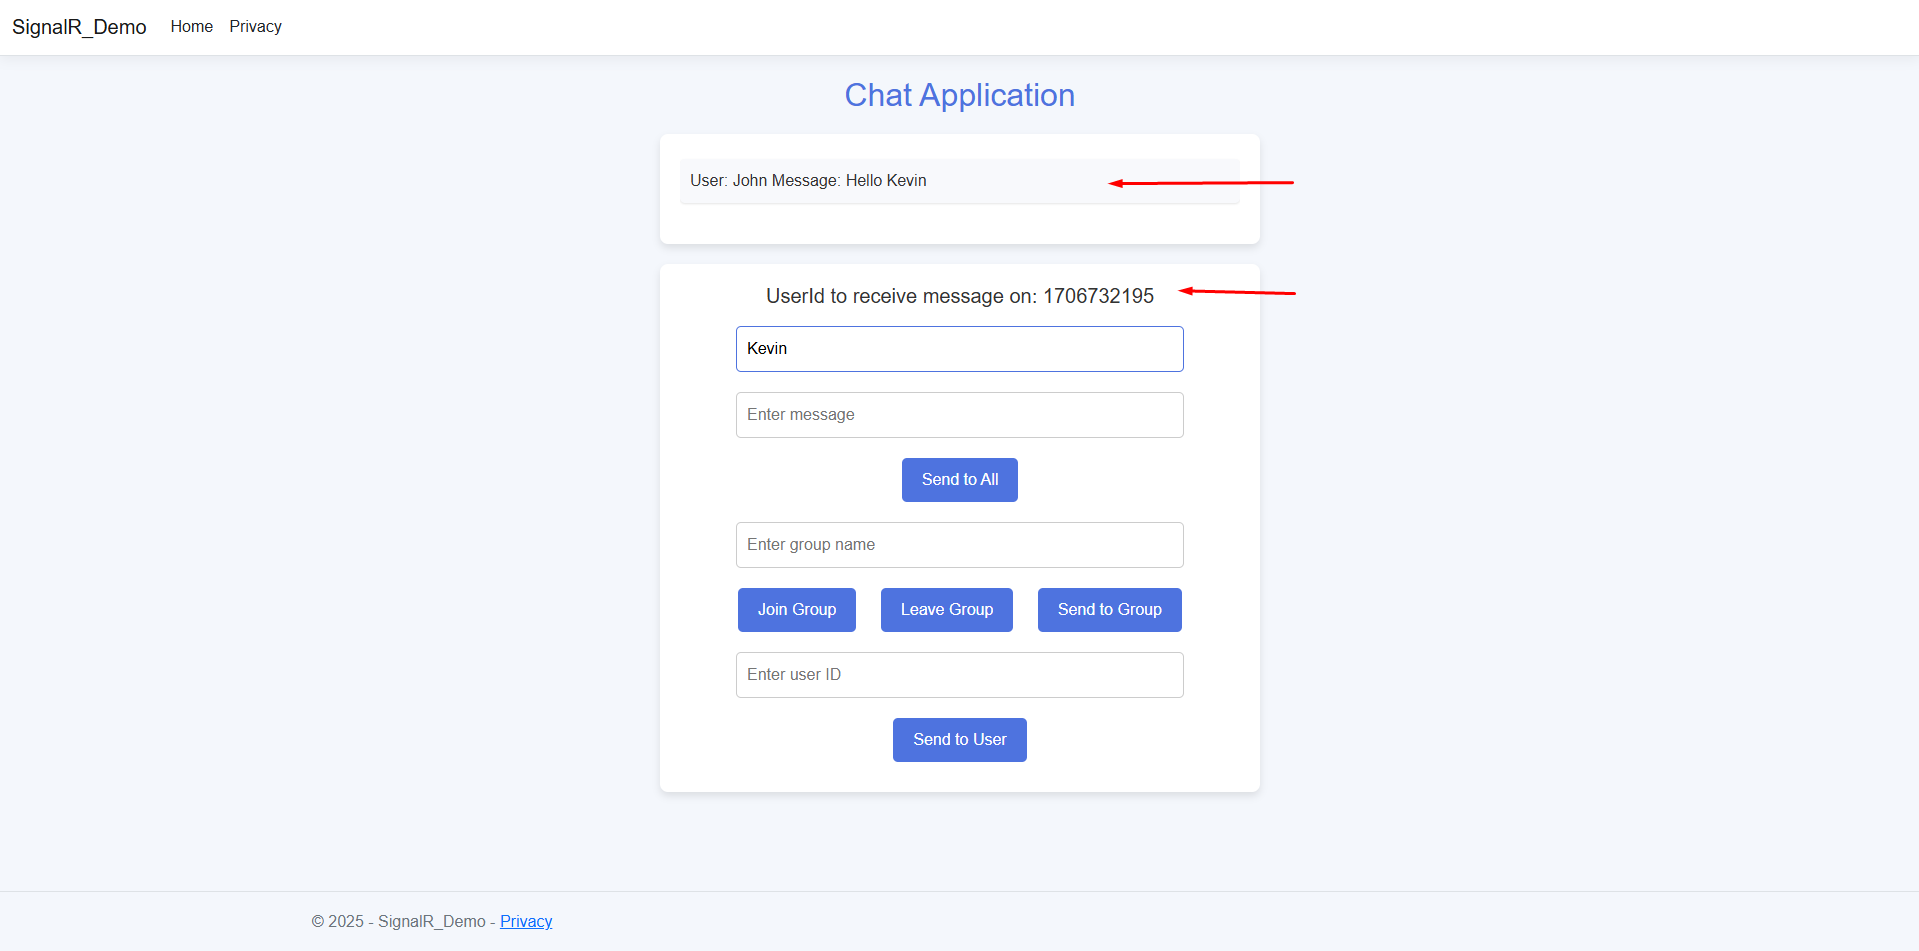
The flow is similer in ui you see a input filed accepting group name basically its an unique identifire which is common for those user who wants to join same group, so user will add that unique identifire press join group button and another user need to do same thing to be part of same group.The below method from ChatHub.cs identifies user by its connectionId and tells signalR that the user belong this group.
Users input a groupName, which acts as an identifier for joining a group.
public async Task JoinGroup(string groupName)
{
    await Groups.AddToGroupAsync(Context.ConnectionId, groupName);
}
And rest of the flow is same when you click on send to group button the event trigger from js file
document.getElementById("sendToGroupButton").addEventListener("click", function () {…}

      //And invoke hub method SendToGroup method which send and sends you message in the group by Clients.Group method.

     await Clients.Group(groupName).SendAsync("SignalREvent", message, userName);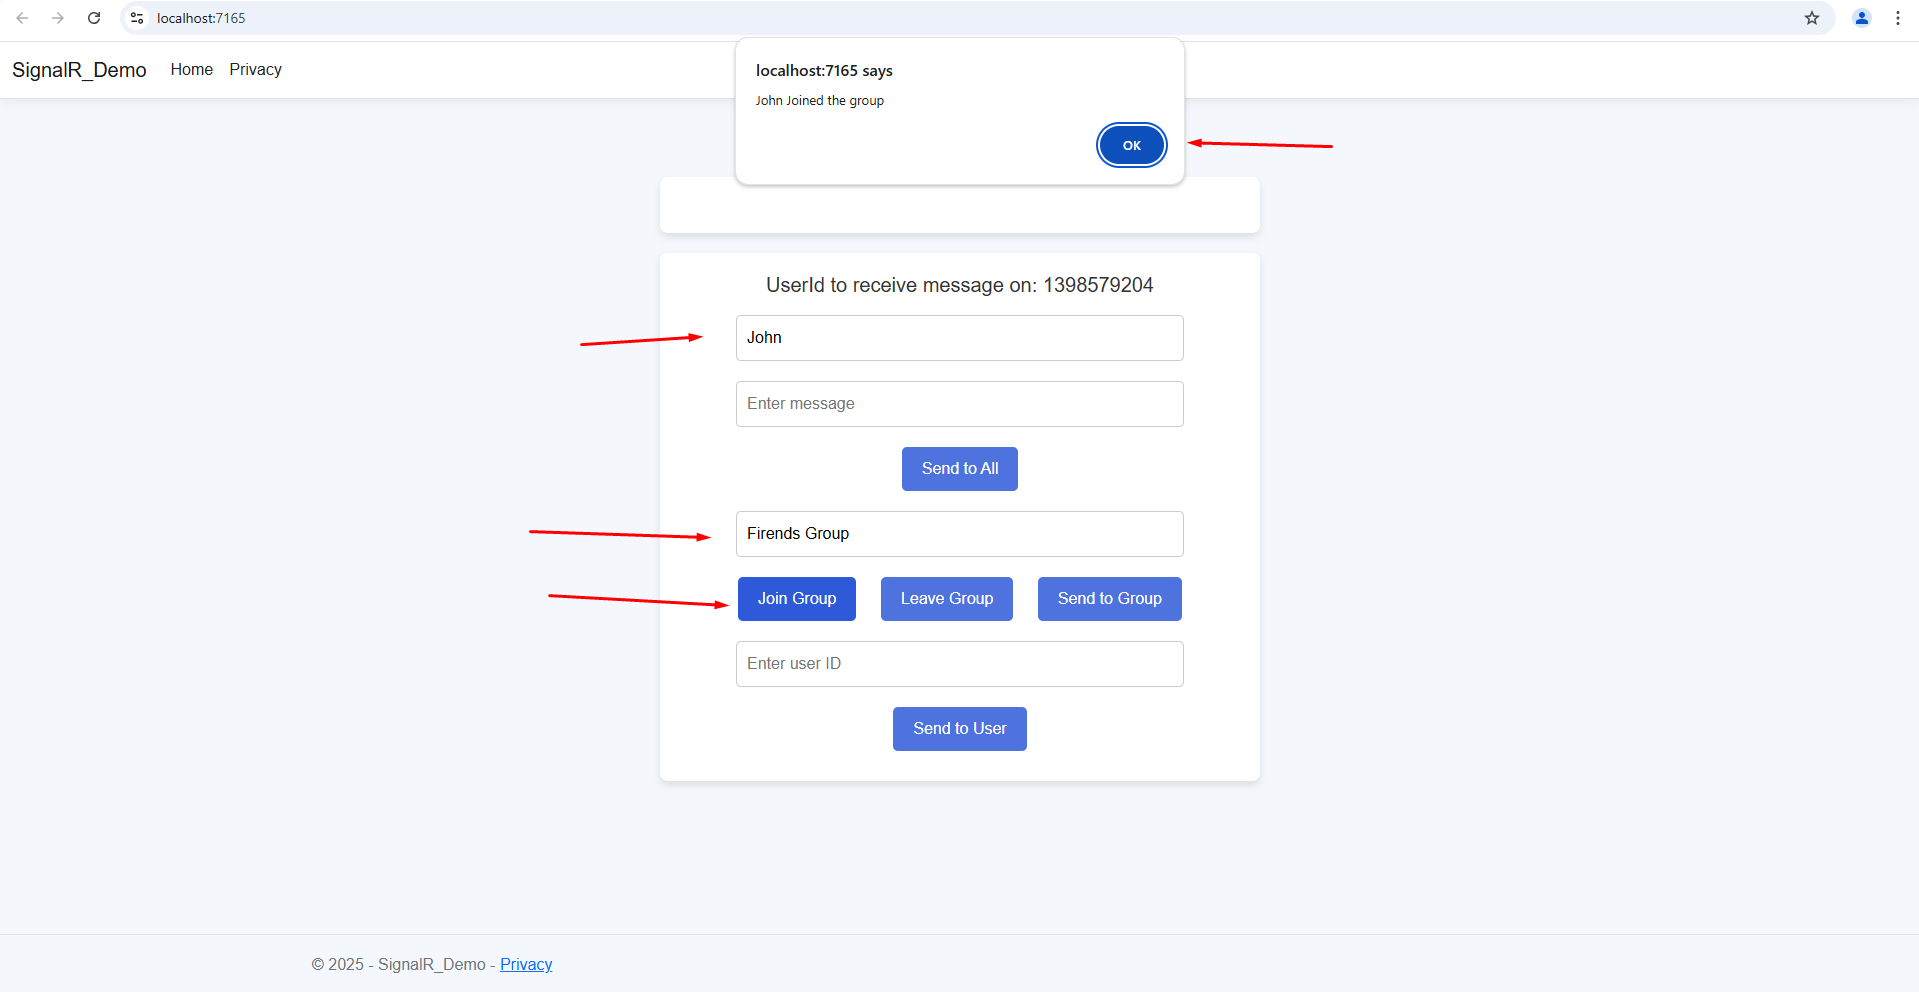
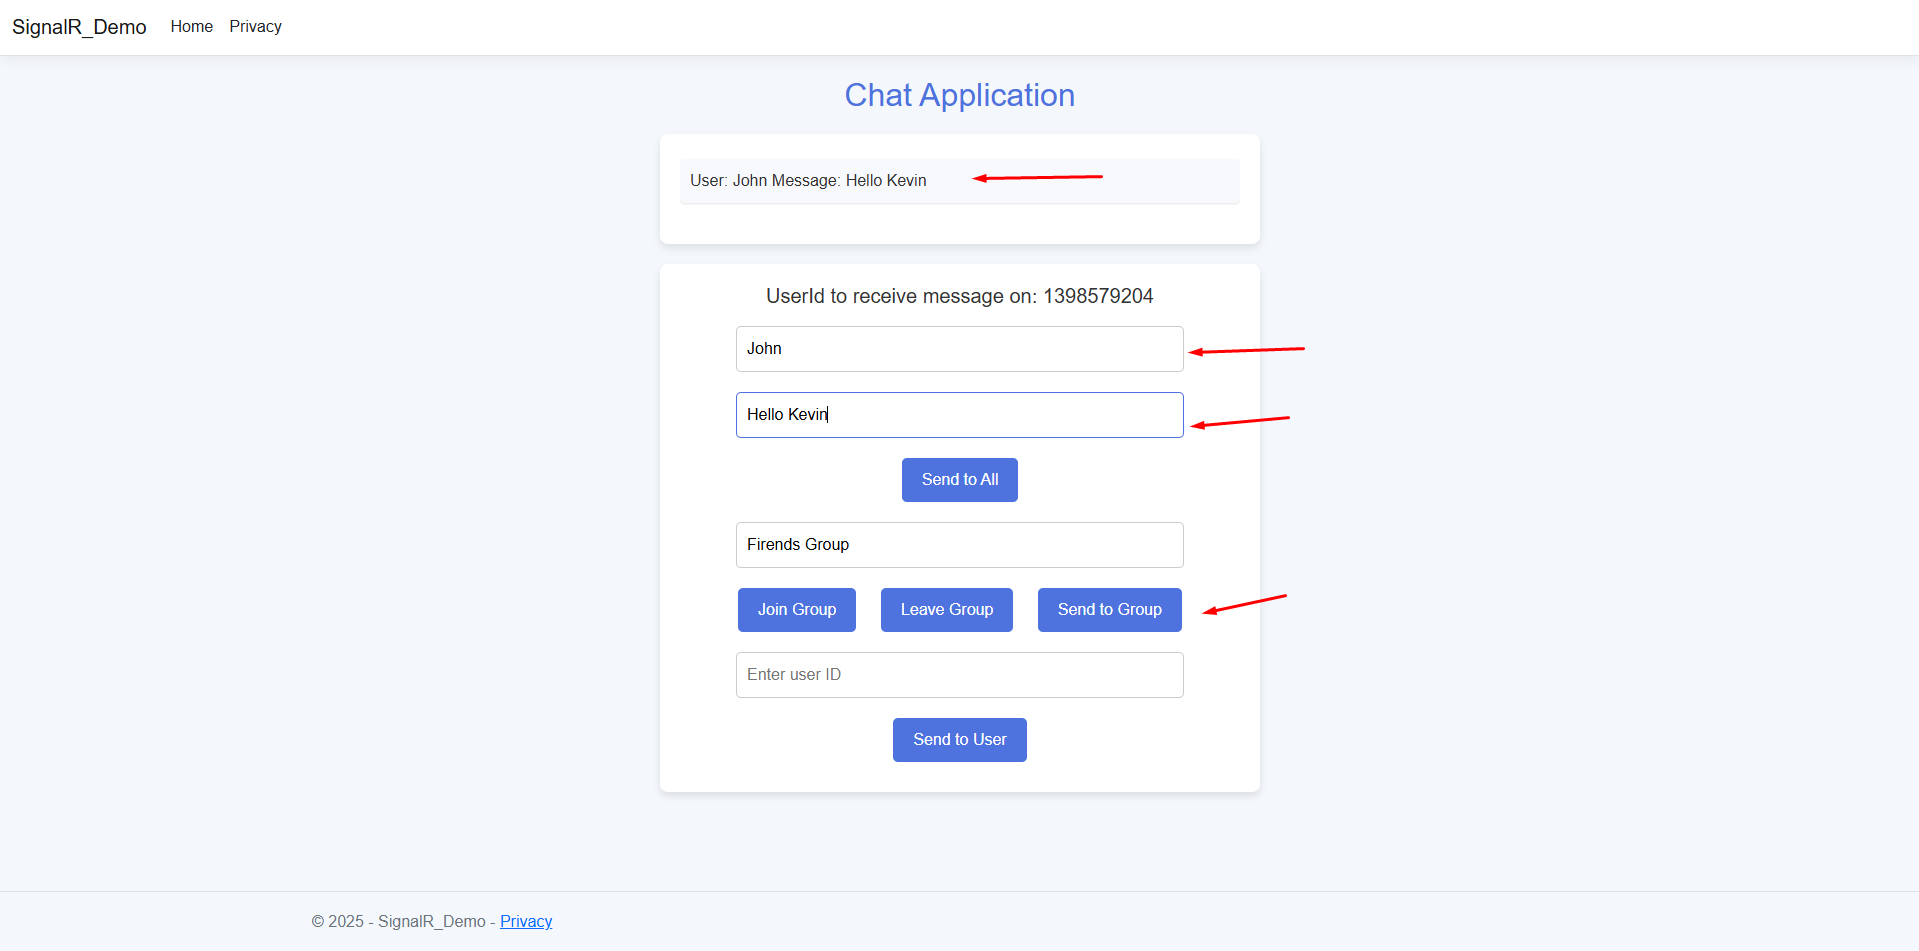
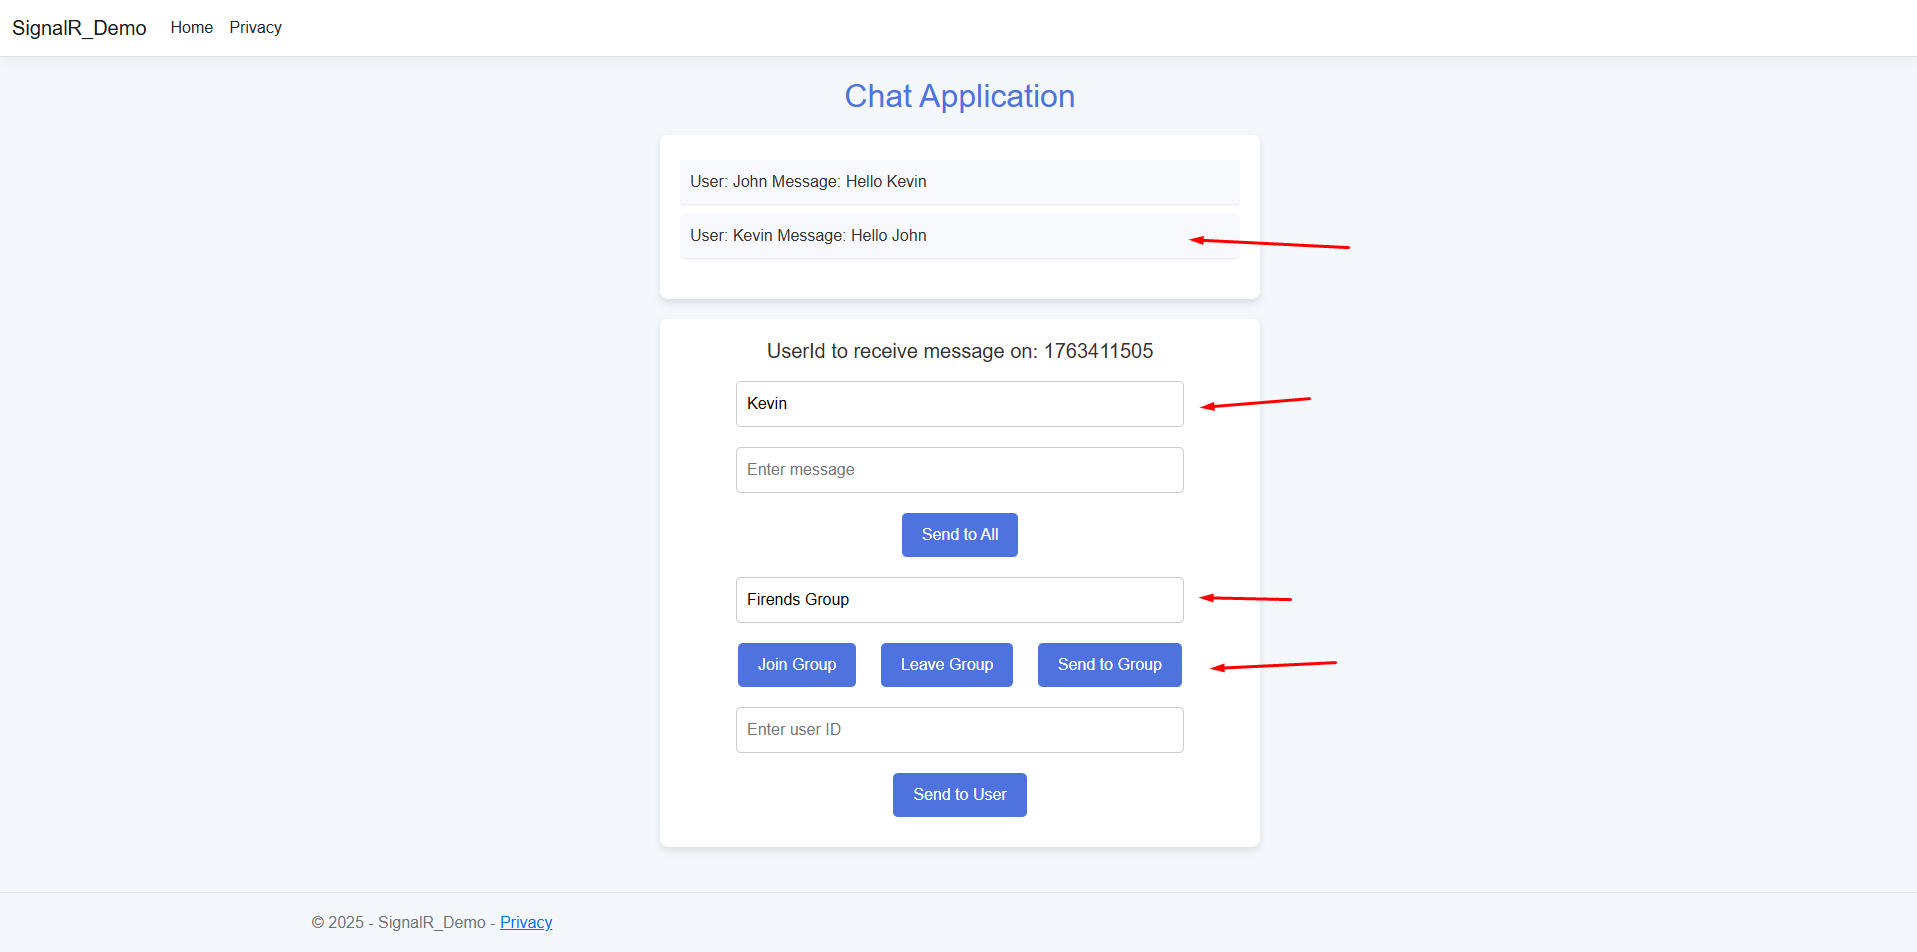
And by clicking on Leave Group button the user can leave group.
public async Task LeaveGroup(string groupName)
{
    await Groups.RemoveFromGroupAsync(Context.ConnectionId, groupName);
}
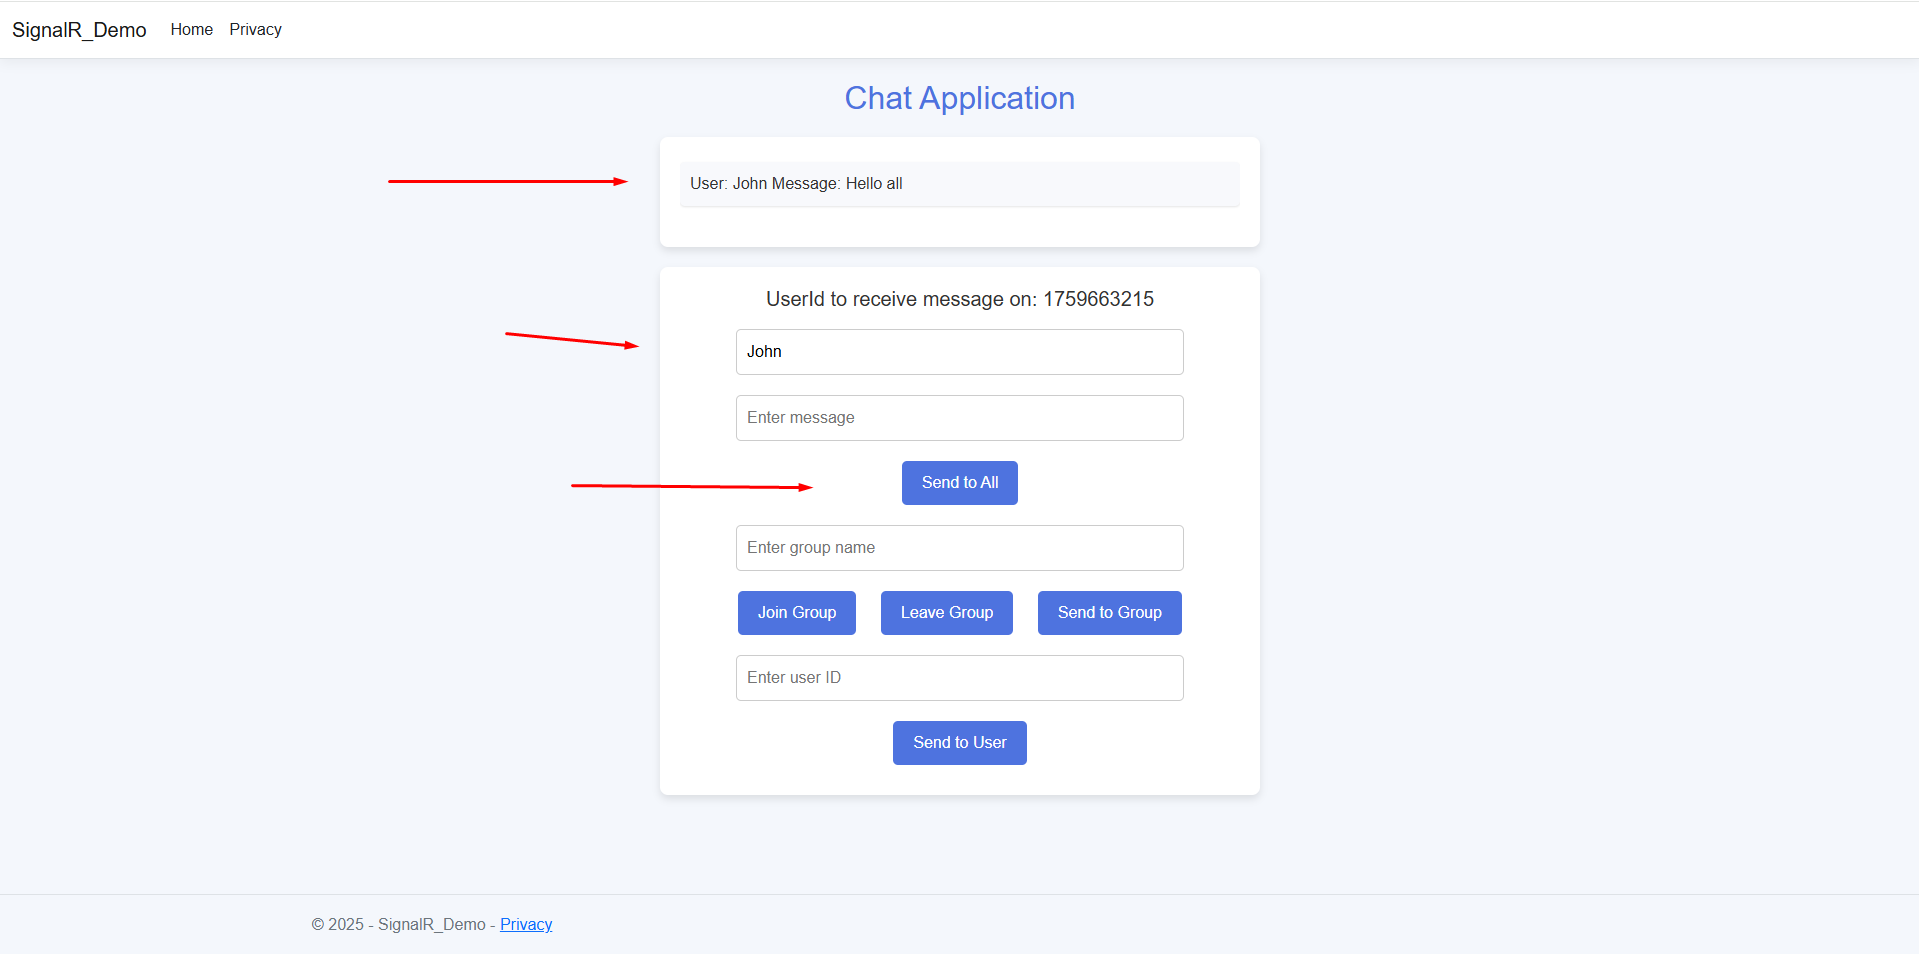
And send to all follows same flow as we have seen just the difference is you don’t need any unique id or groupname idenfire you just connect to signalR connection and your message can be send to all those user who connected to the same connection.
await Clients.All.SendAsync("SignalREvent", message, userName);And its done by Client.All method which sends your message to all connected user and calls function to display message in chat window.
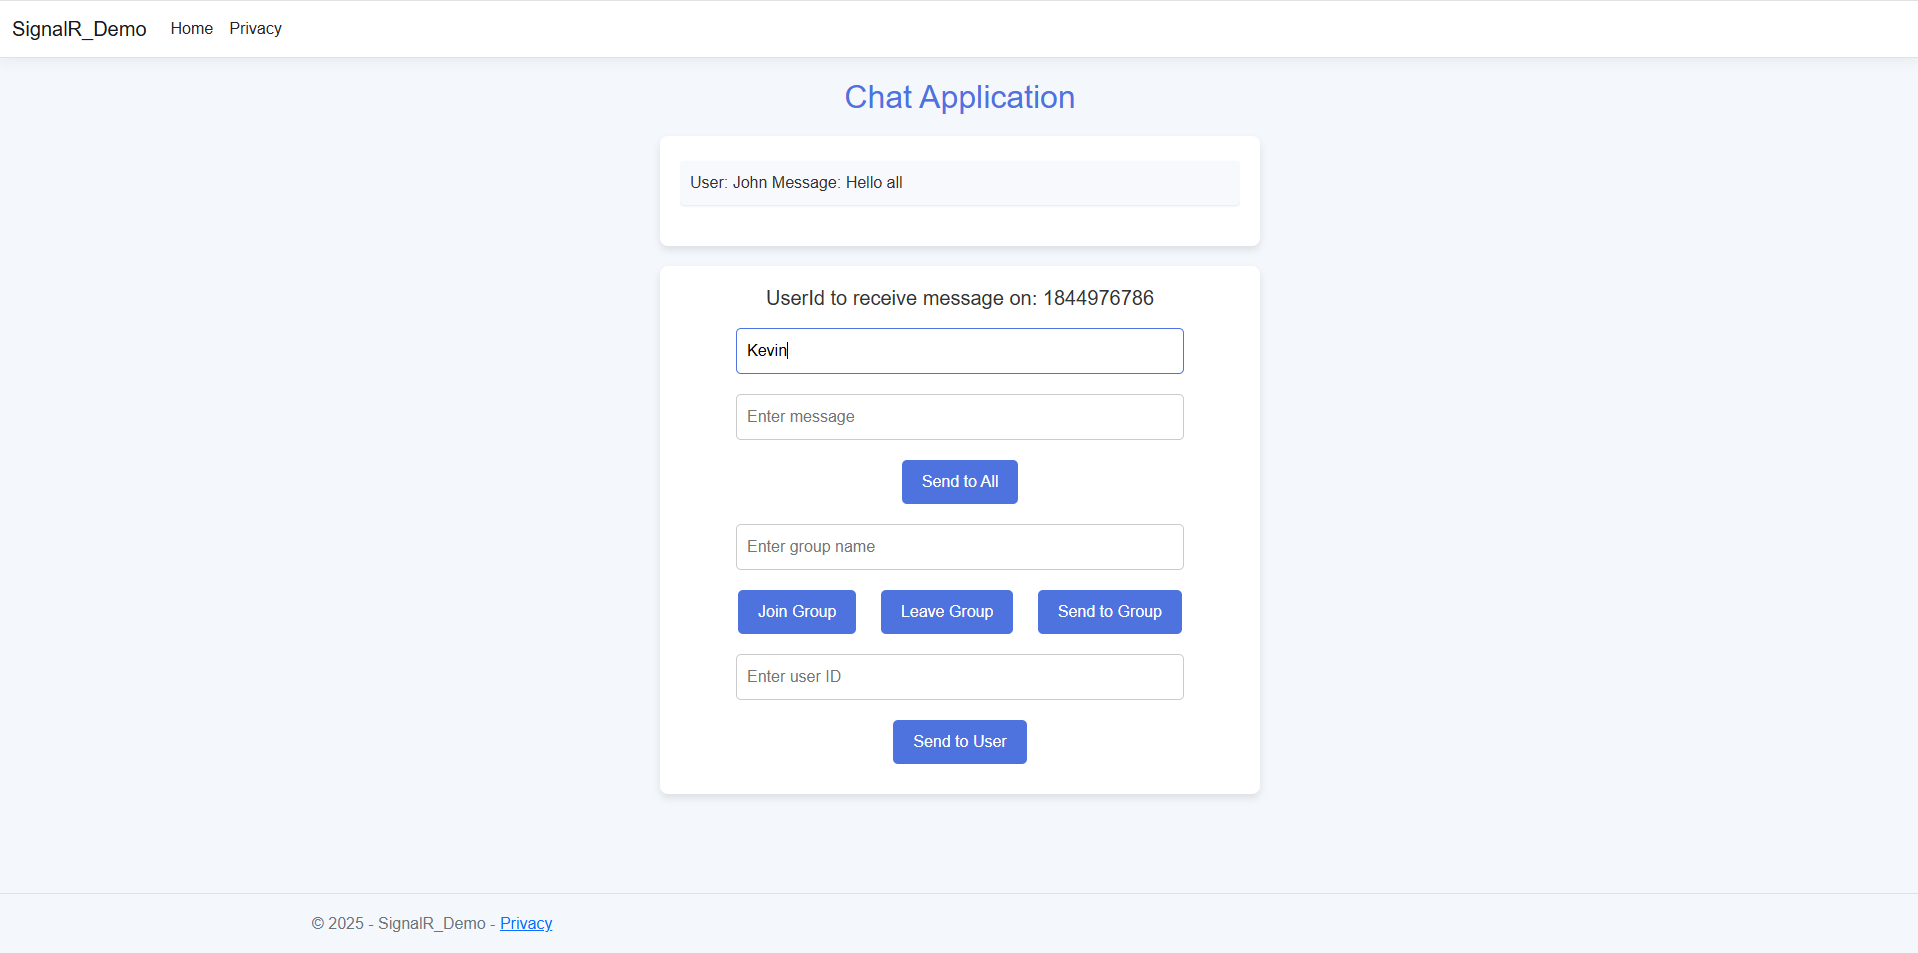
With this implementation, you can effectively send messages to a specific user, a group, or all connected clients using SignalR. By mapping connection IDs to users, handling disconnections, and listening for incoming messages, you ensure seamless real-time communication. Whether you're building a chat application, a notification system, or a collaborative tool, SignalR provides a powerful and scalable way to keep users connected in real time.
When connected users need to be handled, override the methodsOnConnectedAsync andOnDisconnectedAsync:
OnConnectedAsync and OnDisconnectedAsync // to handle connected users in a SignalR hub. public override async Task OnConnectedAsync()
    await Clients.All.SendAsync("UserConnected", Context.ConnectionId);
public override async Task OnDisconnectedAsync(Exception exception)
    await Clients.All.SendAsync("UserDisconnected", Context.ConnectionId);
WebSockets, being the lowest in latency, is the best choice. SignalR automatically selects the optimal transport.
Yes. SignalR falls back to Server-Sent Events (SSE) or Long Polling if WebSockets are unavailable.
SignalR can be scaled using Azure SignalR Service or Redis Backplane.
Yes. Blazor fully supports SignalR WebSockets for real-time updates.
Use JWT Authentication, CORS policies, and SSL/TLS encryption.
WebSockets is a transport protocol, while SignalR is an abstraction with features like automatic reconnection and transport fallback.
SignalR simplifies real-time communication by managing connections, transport selection, and message routing.
Yes, SignalR integrates with RabbitMQ or MassTransit for real-time communication.
SignalR supports JWT-based authentication, ASP.NET Identity Core, and secure WebSockets.
Use Redis backplane, Azure SignalR Service, or Kafka to handle multiple server instances.
Real-time communication is essential in today's digital landscape. Whether for chat applications, collaborative tools, or live updates, SignalR enables seamless messaging.
In our next guide, we will explore how to build a real-time chat application in .NET 8 using:
Ready to build your own ASP.NET Core Chat Application? Hire experienced developers in India and take real-time communication to the next level!
Hire ASP.NET Core Developers

